
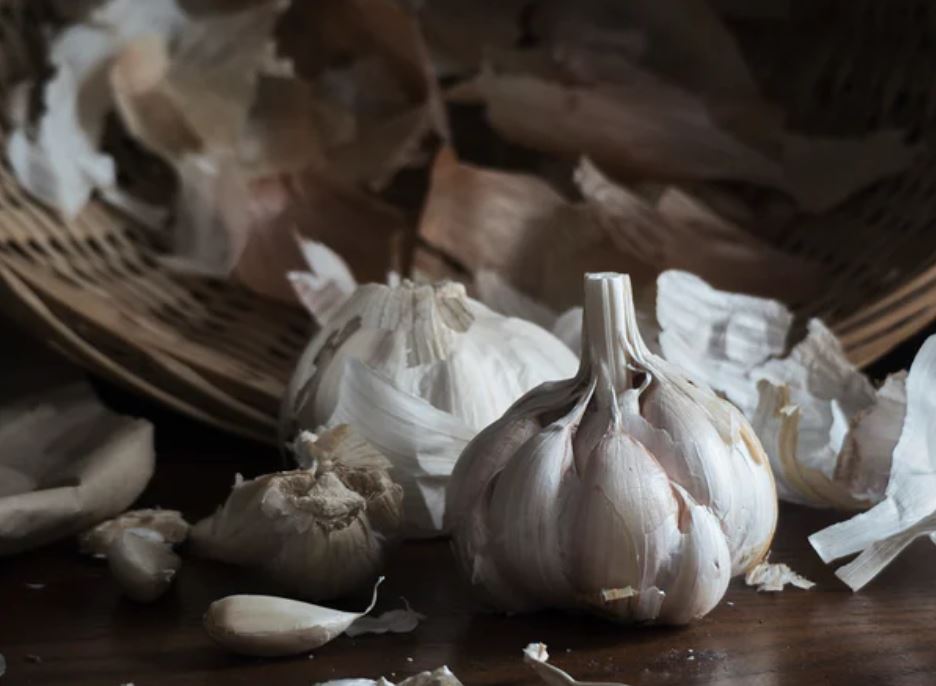
Garlic is a common ingredient that finds a well-earned spot in every cuisine like in beloved local American dishes. The unique taste on offer from garlic has no substitute and nothing even comes close! Garlic lovers will agree on this point.
To enjoy the exquisite taste of garlic you will first have to struggle with the tiresome job of peeling off that tight wrapper! And we will give you six ways to peel garlic easily by removing the garlic wrapping.
Unwrapping garlic can take longer than actually cooking a dish, but luckily, some geniuses have devised a wide array of methods that do actually work.
Some traditional methods can take hours while a few take minutes to take effect. It also depends on what form and age the garlic is. Do note that the following methods are likely to work on all garlic that has undergone curing.
#1) Using a Garlic Peeler
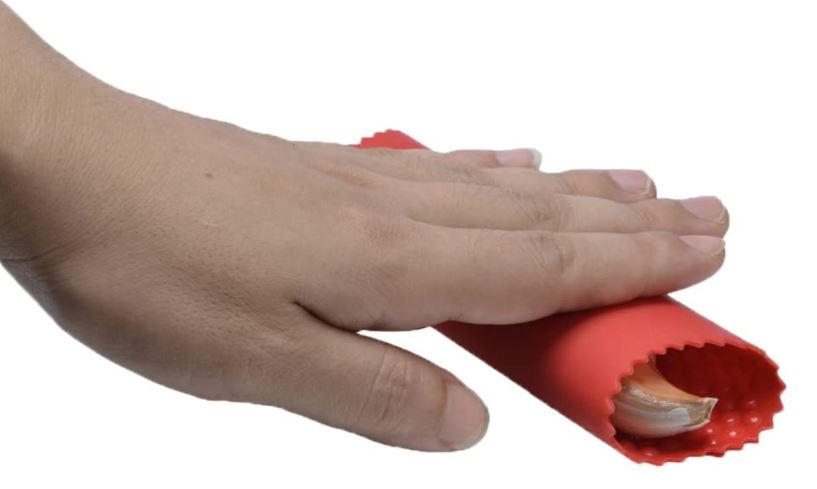
Garlic is difficult to clean if you are inexperienced and it was only a matter of time before a specialized tool was invented. This Garlic peeler is a cylindrical hollow tube made of silicone and it is a must-have in your kitchen.
Let us understand the steps to peel your garlic using a garlic peeler.
Step 1: Place Individual Cloves in the Tube
The garlic peeler works one clove at a time. Put the separate cloves one at a time in the tube. Using your palm, rub the tube backward and forward repeatedly. This friction between the tube and the garlic forces the wrapping to break and come off.
Step 2: Slip Off the Peel
Once you have taken out the clove, removing any peel will be simple and fast.
#2) Peeling garlic by Soaking in Water
Using water to loosen garlic peels is a technique that has been around for a while. This tried and tested method guarantees visible results and can be used by everyone.
If you have a bulk amount of garlic to peel, just soak the garlic in preferably warm water for about 30 minutes and you can easily peel off the wrapping.
Here are the steps for using this way of cleaning garlic.
Step 1: Remove Individual Cloves
If you are starting with full garlic bulbs then you will have to separate the bulb into individual cloves.
This increases surface area and gives the water a larger area to penetrate. You should also take off any loose dry peels.
The tight outer wrapping resembles paper which after soaking will swell and loosen its grip around the garlic clove.
Step 2: Soak the Cloves in Water
Submerge the garlic cloves in 1 to 2 inches of water. Make sure they are all lying flat to ensure complete contact with the water. In a time span as short as 5 minutes you will start to notice swelling of garlic peels.
Although this activity occurs quickly, you can speed up the process by whisking the garlic cloves or shaking the container. This helps to dislodge and remove any loose garlic peels.
Step 3: Remove the Cloves and Hand Peel Them
After soaking for about 30 minutes, the garlic peels should just pare off. Now you will just take seconds to slide the garlic clove out of its slippery peels.
You will also notice many empty garlic skins and wrapping floating in the water showing how effective this age-old technique is.
Why Garlic Turns Green or Blue? Is It Safe or Risky to eat? (Solved & Explained)
#3) Peeling garlic by knife

Cleaning garlic by knife does not require professional chef knife skills! It is a simple technique that gets easier the more you practice. This method of garlic cleaning makes use of a knife as well as pressure.
Step 1: Select a Garlic Clove
From a garlic bulb, select a garlic clove to clean. You can start by peeling any excess wrapping to make this method easier for you. You will only be able to peel a single clove at a time using a knife.
Step 2: Cut off the base
Garlic cloves have a pointy end and a basal end that is flat and rough. Using the sharp end of a knife, cut off the base. This will help to remove the peel by eliminating the joint between the garlic peel and the base.
Step 3: Use the Flat Side of the Knife
Place the clove on its side after removing the basal end with a knife. Place the flat face of the knife over the clove and make sure it is tight and fitting. Using your palm, hit the knife with blunt force.
Remove the knife to expose a cracked clove with the peel shattered. At this point, it would be easy to peel off the outer cover which is no longer fully attached to the clove.
The clove at this point might get slightly disfigured and you will learn the art of how much pressure to apply slowly.
Having smashed garlic is not a problem if you intend on mincing or chopping your garlic before use.
#4) Smashing Gently
The word “smashing” might paint a different picture in your mind than the one that we mean!
We are referring to using gentle force to crack the tight outer covering around the garlic.
Luckily, this technique can clean quite a few garlic cloves at a time. If done correctly, your garlic will still be in shape after the full cleaning process is complete.
Step 1: Remove the Bulb Wrapping
Like most garlic peeling techniques, you first have to remove outer accessory skins and the core of the garlic bulb (in the case of hardneck garlic). After this, you should be left with garlic cloves surrounded by just one outer tough garlic wrapping.
Step 2: Space Out the Cloves on a Board
Place each separated clove on a flat wooden board. Space them out to make sure they do not clump together but are still close. Use a dry cloth to cover all the garlic cloves. This cloth keeps the cloves in place and keeps the mess to a minimum.
Step 3: Pick Your Weapon!
Choose a weighted flat utensil (mallet, pistol, or heavy pot) that will apply equal pressure to all the garlic cloves. Use your object of choice to slightly smash down on the garlic cloves. A few hits should be enough to cause a fracture in the outer wrapping.
Step 4: Remove the Cloth
You must avoid over-smashing the garlic cloves or you will be left with garlic paste!
You can make sure this does not happen by taking off the cloth and checking for impact. Usually, 1 to 3 smashes are enough to get the job done.
If there are portions of clean garlic visible, you can start peeling off the hard outer protective cover without disrupting the garlic clove itself. Some wrapping is attached to the base, use a knife to remove the base and wrapper.
#5) Microwave to peel Garlic

Using a microwave to peel garlic? I know this sounds absurd and unconventional, but it actually works! It is less labor-intensive than other methods and is effective in collectively peeling several cloves.
Step 1: Clean and Separate Garlic Bulbs
Microwaving an entire garlic bulb would not be effective, in fact, it could be dangerous! Lay the garlic cloves on a microwavable plate and microwave them for a short time (not more than 5 to 10 seconds).
You will know they are done by noticing slight swelling and bubbling of the garlic clove.
This method of peeling can alternatively be also done in an oven. People who clean their garlic just before use can adopt this method.
The heat allows the garlic to lightly cook.
Step 2: Retrieve the Garlic Clove
At this point, the garlic cloves should slip out of their hard casing which is ruptured by the heat of the microwave. It would take a few minutes to remove the peels. Some clove peels might offer some resistance.
A knife will solve the problem as you can cut off the ends by which the wrapping is joined to the clove.
#6) Shaking for peeling the Garlic
Another unexpected technique is shaking the garlic to peel off the skin. It requires minimal tools and all you require are the garlic bulbs and two bowls (preferably made of steel) or a jar.
Step 1: Pull the Garlic Bulbs Apart
Separate the garlic bulbs into individual cloves making it easier to break the outer wrapping. Not much success will be possible if you use full bulbs or conjoined cloves.
Step 2: Put the Cloves in the Bowl
Place the garlic cloves in the bowl. According to the size of the bowl, place an adequate number of garlic cloves. Placing too many will take more effort, while too few can take forever! Use your judgment and place them accordingly.
Step 3: Cover the Bowl With Another Bowl
Use the other steel bowl to cover the one with garlic. Grab each end of the closure and shake the bowls vigorously. After shaking for a few seconds you can open the bowls to see peels and cloves gathered at different ends of the bowl.
An easy way instead of using two bowls would be to use an empty jar if you have one.
Step 4: Remove Empty Shells
Make more space by taking out all dry wrapping that has been repelled by the garlic cloves. Close the bowls again and do it a few times to make sure a maximum amount of peels are removed from the cloves.
Step 5: Lift Bowl
After repeating this process a few times the garlic should be completely clean with its skins peeled off. If not, any remaining wrapping can easily be pulled off by hand. A simple wash can help get rid of small fragments of wrapping that are stuck to the clean garlic cloves.
How to Store Peeled Garlic for LongTerm?
Once you have your clean garlic, the question of storing arises.
- Drying garlic is an effective way that allows it to retain usability for long periods. This is because drying removes moisture.
- Freezing whole garlic is common as it is the most effective way to delay spoilage. You can freeze garlic peeled or unpeeled, whole, chopped, or minced. You can choose any option you would like.
- Preservation spirits such as oil or vinegar can make peeled garlic last beyond its time. This is simply because these fluids inhibit the development and reproduction of microorganisms that cause food decay.
How do you peel garlic in a large quantity?
When it comes to cleaning bulk quantities of garlic, techniques like soaking in water, and shaking using bowls or jar is quite effective.
If you are willing to grow garlic plants in the future, we advise you to have a look at our complete guide on how to plant garlic.
