
Once the hard part of caring for growing garlic is over, you will need to plan about curing and storing garlic after the harvest.
Curing and storing garlic helps to keep Garlic healthy and safe to consume for a longer duration.
Curing is a process that applies to drying out an edible item, in this case, garlic without removing leaves. Because garlic is a root vegetable, it will contain moisture. Hence, this process actually refers to drying out the wrapping of the garlic. Curing helps keep vegetables stored for a longer duration.
After curing comes the storing of garlic. And if not stored well, a harvest of fresh garlic will not last long.
Hence you would need to plan well about storing your garlic keeping in mind all the effort you have put into growing garlic. Just remember that you must collect the best and the largest garlic for the next fall. Planting them can give great results next time in terms of garlic bulb size.
Cleaning and storing garlic is usually the process that follows just after the garlic harvest and curing. It ensures garlic has a longer life and is safe to consume.
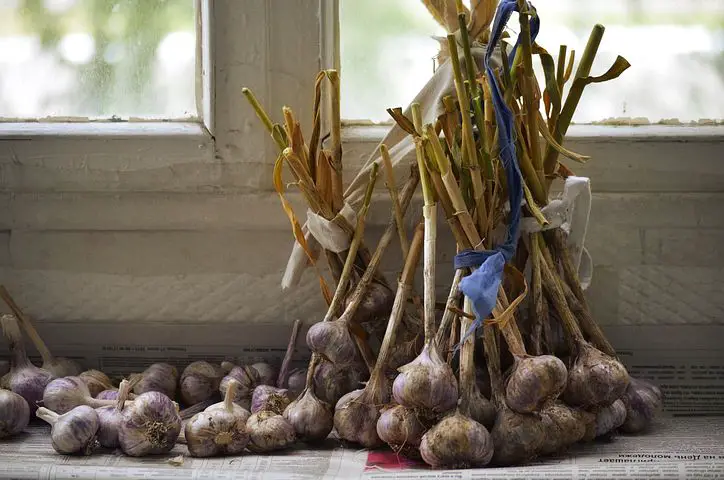
How to Cure Garlic?
During curing, the garlic draws energy from the leaves of the plant, which is why they should not be cut off. This is done till the garlic is dry.
Curing garlic is essentially a 2-week process that can dictate the lifespan of your garlic. Garlic curing is usually done by collecting a bunch of garlic with leaves on it and hanging them. Tie the leaves together and allow them to aerate, bulb down.
An alternate method involves lining the garlic in a single file to ensure enough air is reaching all sides of the bulb to dry it. Spacing is crucial in this method since placing them too close together can lead to retention of moisture.
How long does garlic take to cure?
A fresh garlic harvest takes a minimum of 10 to 14 days to completely cure. They can take more or less time than this depending on factors such as variant, size, weather, and curing technique. Some garlic growers even cure garlic for around 3 to 4 weeks.
A tip for curing garlic – you will know that garlic bulbs are completely cured when the outer papery wrapping is dry and flaky, stems are restricted, and the central stem is hard. This is the time you can clean the garlic and place it in your selected storage place.
How to Grow Garlic Indoors? Growing Garlic Bulbs and Scapes in Pots
Storing Garlic
Storing garlic lets you enjoy the taste of your garlic for many months to come! This is required as you will not be able to use your entire garlic harvest fast enough before it naturally decays.
Below are the do’s and don’ts that would help you.
Do’s for storing garlic
- Keep the leaves on initially, remove them after curing
- Use a dark area to store garlic
- Keep them completely dry, not even a drop of water!
- Remove rotten or infected bulbs as and when you see them
- Place them in a line with enough spacing for air to circulate and dry them
- Remove dirt and the outer layer before storing and curing
- Keep them away from insects
Dont’s for storing garlic
- Do not put them directly in the sun
- Do not wash them after harvest or before storage
- Avoid snipping off the leaves and roots immediately
- Do not stack them on top of each other
Storing Dry Garlic Bulbs
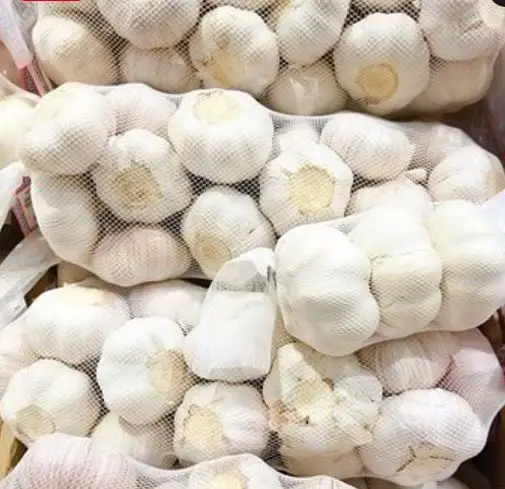
Cured garlic is easier to keep as long as the outer layers are undamaged and intact. You can easily put the garlic in netted mesh bags which can be hung. You can also opt for well-ventilated containers that are out of direct sunlight.
Garlic stored this way can last anywhere between 5 and 8 months.
Braid Your Garlic
Braiding your garlic has many advantages such as helping your garlic to cure better, utilizing space efficiently, and also looking much more attractive! Garlic braids are done using soft neck garlic since they have soft easy-to-braid stalks.
Hardneck garlics need to be stored another way as they cannot be braided easily. They are usually kept without the stems and just as bulbs.
How to Braid Garlic?
Creating a braid and hanging garlic to dry is an age-old tradition in many parts of the world.
Braiding your garlic refers to crossing the soft garlic stems to make a braid. A garlic braid is the crossing or interlacing of three (or more) garlic stems to make a pattern.
But how to braid garlic is not a common skill.
Here is a simple method on how you can braid softneck garlic with the stalk.
- Take 3 garlic heads and place them near so that each of their stalks crosses each other
- Tie the stalks together at the base of the stem
- Place another bulb in the middle
- Put the right side stalks over the middle stalks
- Place another bulb on the right side
- Cross the left side stalks over all the middle stems
- Place another bulb on the left side
- Cross the right side stalks over all the middle stems
- Place another bulb in the middle
- Cross the left side stalks over the middle stalks
- Repeat this process till you have a braid of 8 to 20 garlic heads
Hang up the braid in a well-aired place away from water or other liquids. Now, you can snip off garlic bulbs and use them when you need them.
How to Store Peeled Garlic?
Most people prefer storing peeled garlic as it is more convenient since it can be used as-is. One con of storing peeled garlic is that it is much more vulnerable to rotting and gets perished soon.
Sources of contaminants that induce rotting are in the air, water, containers, utensils, and even on our hands!
Below are the ways that can reduce the rate of decay and preserve the peeled garlic longer.
Freezing
Extremely low temperatures deter the growth and proliferation of contaminants, making freezing an effective method of storing peeled garlic.
You can clean the garlic and freeze the cloves whole. Or you can use a food processor to make a garlic paste consisting of 1 part oil and 3 parts garlic. Even more appealing is the fact that this garlic paste can be used in this frozen form.
Drying
Ever heard about onion powder or ginger powder?
The same technique applies to peeled garlic to make a powder. Powders are a fool-proof way of preserving a vegetable while concentrating the flavor.
Peel the cloves, chop them finely and then dry them using heat first at a temperature of 140 ℉ and then at a temperature of 130 ℉ for an hour or two. When the garlic has a crispy appearance, you know the process is done.
These dried garlic slices can then be pulverized in a mortar and pestle to make a fine powder. Keep the garlic dry and away from water to assure it stays well.
Wine/Oil/Vinegar
For many generations, using certain liquids like oil has helped to store and keep many edibles including vegetables. The three most common types of preserving liquids are wine, oil, and vinegar.
- Oil helps to create an air-tight layer between your garlic and the contaminants residing in the air.
- Vinegar has a pH that is too acidic for bacteria and other microorganisms to survive let alone grow.
Soil Requirements of Garlic, Types of Soil Fit For Garlic Growing
Preparing garlic for planting in the next fall
While sorting out your harvested garlic, pick the best out of the bunch to plant and reap an excellent garlic harvest next year.
Knowing which garlic is best for planting depends on 3 main properties: size, outer wrapping, and texture.
Size
Save the largest garlic bulbs for planting since they will grow and develop into large garlic bulbs after sprouting and maturing. Plant medium-sized garlic if you want this size of garlic. Small garlic heads are best for consumption as they will only give small heads which might be a waste of your resources.
Outer Wrapping
The condition of the outer wrapper gives a clue as to how healthy the garlic bulb is. Bulbs with poor health will have discolored outer wrapping. The presence of any brown or black spots is also a sign of disease and insect infestation.
If you notice any of these signs, throw them far away from healthy garlic. This is to avoid the spreading of the infestation. Wrapping that has bubbles and moisture is not fit for keeping and should be dried out first.
Texture
The texture of good garlic for planting should be hard and dry. Water can make garlic soft and also cause garlic to rot even faster. Try to avoid soft garlic when planting garlic cloves, only hard garlic will sprout and grow.
Even a slightly rubber-like texture is unacceptable. In some cases just before planting, you can germinate the garlic so that sprouts form. This type of garlic is better for planting and helps the garlic grow and develop a root system faster.
FAQs
We do not advise you to store garlic without first curing it. This is because the garlic will tend to rot since it has moisture within the bulb and leaves. You can start using your garlic as soon as you harvest it, any garlic left after this must be dried out to ward off rotting and spoilage.
Cleaning your garlic after harvest includes dusting off soil and trimming down unnecessary leaves and stem portions. By removing these leaves, you will automatically have to remove a layer or two of the outer covering.
Try not to remove too many layers. So as soon as the wrapping looks white and clean, stop removing it anymore. Never use water to clean your garlic, especially when it has the peel on and curing is pending.
Garlic that has undergone curing will last longer than garlic that has not undergone this vital process. That said, cured garlic can be stored from harvest time to next fall. Keep them dry at 50℉ to be usable in the future.
Between 40-50℉ will result in sprouting during storage and above 65℉ will result in late sprouting and growth. Humidity should be between 65 and 70%.
